Hey guys! Here is a new nail tutorial for you. This time, I was inspired by the Holidays. Even though fall is not over, soon we will have snow and lights decorating our houses, hence the white and gold! This is the first design of a Holiday/Winter Collection. Tell me which of the designs for this look is your favorite!
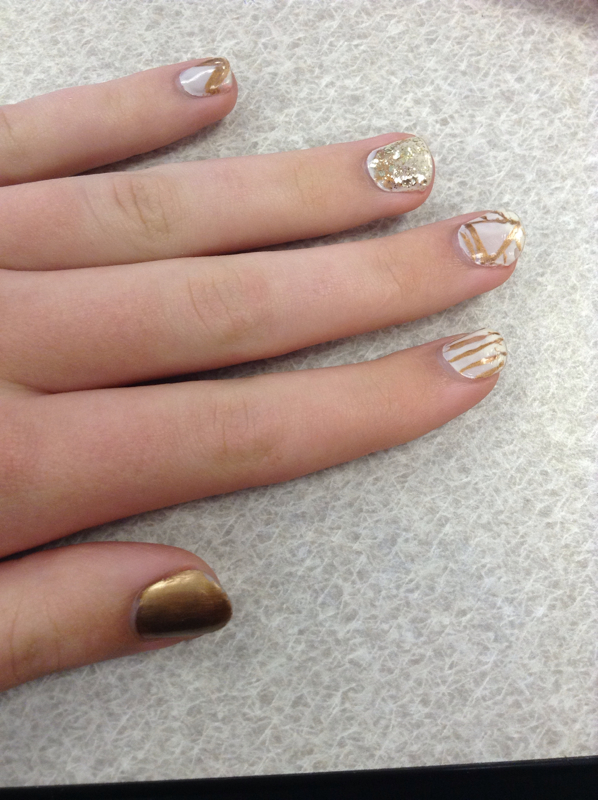
To start off, paint your thumb completely gold and the rest of your fingers completely white. I used Ciaté in snow virgin for the white and the China Glaze Metallic Gold for the gold color. If you are using the same white nail polish as me, you might want to put multiple coats for the white for it to be more visible.
Next, with that same gold, paint stripes on your index finger. This tutorial was not precise so you do not need to use tape to create perfect lines. You can even choose to make your lines thin and thick! On your middle finger, draw a triangle from the middle of the tip of your nail to the base of your nail. Create horizontal lines in the background. Be careful to make the lines on the same level on each side of the triangle so that they look like they are the same line. On your ring finger, I messily painted a little bit of gold at the base of my nail then coated my nail with the Sephora 06 Gold Forever nail polish. For your pinky finger, create a triangle, from the tip of your nail with no base, then create the same design a little bit lower and fill in the gap. And that is it, just wait 5 minutes before coating your nails with a transparent protective coat to finish off your look!
XO Felicie
 RSS Feed